There’s nothing quite like the warm, organic feel of a freshly refinished wooden floor. Whether you’re restoring the original charm of a Victorian terrace or updating a mid-century flat in London, getting your floor finish right can transform the entire space. But the road to a picture-perfect finish is paved with potential mistakes—just ask YouTubers who’ve tried (and failed) to DIY their floor projects. Today, we’re highlighting more real-world failures so you can avoid costly mistakes, wasted weekends, and scratched-up regret.
If you're a DIY enthusiast, a young professional transforming your first home, or even a skilled tradesman looking to brush up your game, this guide draws on actual errors made by real people (with the footage to prove it). Learn what went wrong, why it happened, and how you can do it better. Let’s get into the most common and cringe-worthy wood floor refinishing fails, so you don’t become the next viral blunder!
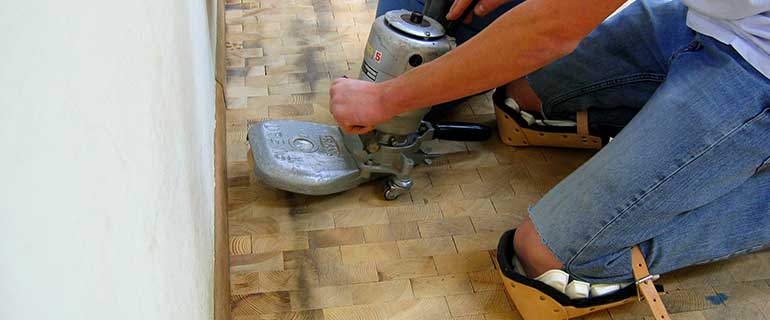
1. Skipping the Sanding – When Shine Masks a Multitude of Sins
One of the most fundamental steps in refinishing a wood floor is sanding. Yet countless YouTubers think they can skip or shortcut this step, only to end up with uneven finishes that peel, flake, or reveal scratches they thought were “not that deep.”
Sanding removes the existing finish, evens out surface imperfections, and provides the necessary texture for the new stain or sealer to adhere properly. Bypassing this process typically results in a surface that looks decent for a few weeks, then abruptly deteriorates.
Common mistake: Using a handheld sander or random orbital sander on a large floor. These tools are great for edges and detail work, but they can’t compete with the power and even surface coverage of a drum or belt sander.
The solution: Hire a proper floor sander or get a professional to do this stage. If you're committed to sanding yourself, invest time learning how to properly handle the machine—starting coarse and moving progressively to finer grits (usually starting at 36-grit and ending at 120-grit).
2. Choosing the Wrong Finish – Glossy Doesn’t Always Mean Glamorous
Online creators often go for the shiniest option available when selecting a floor finish, assuming high gloss equals high-end. However, your floor’s finish must match your lifestyle, aesthetic goals, and space usage—not just your aspirations.
What many YouTubers don’t realise until it’s too late is that glossy finishes highlight every imperfection, every dust speck, and every footprint. A high-gloss floor in a family home or rented flat is likely to look worn within days.
Common mistake: Applying polyurethane gloss in high-traffic zones without considering maintenance. Worse still, not checking if their old finish is oil- or water-based, leading to bonding issues.
The solution: For a more forgiving finish, consider a matt or satin seal. These finishes disguise minor blemishes better and tend to wear more evenly. Also, do a patch test before full application to ensure compatibility with previous finishes.
3. Not Cleaning Between Sanding Passes – Dust in the Details
If you’ve ever watched a time-lapse refinishing video, you’ll notice many skip key “boring” steps—like cleaning between sanding passes. But if you neglect to vacuum and wipe down the surface between each round of sanding, you’re simply grinding dust back into your floor.
This can lead to clogs in your sandpaper, swirls in your grain, and finish bubbles down the line. It also prevents a crisp, uniform look—especially if you're applying a light stain colour like oak or ash.
Common mistake: Using a leaf blower or dry broom to "clean up" sawdust, spreading fine particulates back into the air (and onto your drying finish).
The solution: Use a shop vac with a HEPA filter and a tack cloth or slightly damp microfibre mop. Always allow dust to settle before applying your next layer of stain or finish, and ventilate effectively to control airborne particles.
4. Rushing the Dry Time – The Impatient DIY Disaster
Impatience is the downfall of many YouTube-inspired DIY projects. In the race to get that final “after” shot, many don’t wait the full recommended drying time between coats, leading to tacky floors, smudges, and trapped debris under the finish.
Each layer of stain or seal must dry completely to bond properly. Cutting corners can cause streaks, peeling, or cloudy finishes where the underlayers haven’t cured. Drying time can vary drastically depending on temperature, humidity, and product type.
Common mistake: Walking on floors too soon or moving furniture back before the sealer has fully hardened (which can take up to one week for oil-based products!).
The solution: Refer to the product’s datasheet for drying and curing times. Plan to stay off the floors for at least 24 hours after your final coat, and delay moving furniture or rugs for 5–7 days if needed.
5. Uneven Application – Lap Marks & Roller Lines Galore
Applying finish takes finesse. Many fail to maintain a “wet edge”—the continuous overlap of fresh product—which leads to lap marks, bubbles, or visible roller lines.
What’s more, applying too much or too little product per square metre results in inconsistent sheen levels. Portions of the floor may look dull while others glow unnaturally.
Common mistake: Using a standard paint roller and tray without a flooring-specific applicator or T-bar. Others apply too slowly, letting the finish dry mid-pass and locking in roller patterns.
The solution: Use the right tools: lambswool applicators or professional-grade T-bars work best for even application. Work in sections, maintaining a rhythm and keeping your work area properly lit to spot missed spots immediately.
6. Ignoring Room Conditions – Moisture, Temperature & Ventilation
Your floor might be ready, and your products might be top-notch, but if the room’s environment isn’t right, your finish can fail spectacularly. Unfortunately, this is rarely mentioned in DIY videos—until too late.
High humidity can slow drying and cause hazing; low temperatures can prevent proper curing. Poor airflow can trap vapours and prolong cure times, while direct sun exposure can speed-dry finishes unevenly.
Common mistake: Finishing floors during winter in poorly heated rooms or during a UK heatwave, when super-fast drying leads to lap marks and air bubbles.
The solution: Aim for 18°C to 25°C with relative humidity below 60%. Use dehumidifiers or fans as needed. Allow natural ventilation but avoid strong draughts that stir dust or dry the finish too quickly. Always read the guidelines for ideal application conditions for your chosen finish type.
Table of Common Wood Floor Refinishing Fails and Fixes
| Fail | What Went Wrong | Professional Tip |
|---|---|---|
| Skipping Sanding | Poor adhesion and uneven finish | Use a drum sander with progressive grits |
| Wrong Finish Choice | High maintenance and unsightly wear | Opt for satin or matt in high traffic areas |
| Not Cleaning Between Passes | Dust in the finish, rough surface | Vacuum and tack cloth between each grit |
| Rushing Dry Time | Tacky floors, poor bonding | Wait 24–72 hours & longer for furniture |
| Uneven Application | Lap marks, roller lines | Use a T-bar and maintain a wet edge |
| Ignoring Conditions | Slow drying, hazing, or bubbling | Control temperature & humidity during job |
Final Thoughts – Learn from Their Mistakes, Nail Your First Try
When you’re midway through a DIY project, it’s easy to fall into traps that others have already made. That’s why watching YouTube “fail” videos is almost as useful as instructional ones—they highlight what not to do. But even more powerful is learning the technical why behind each issue.
Wood floor refinishing is as much about patience and preparation as it is about varnish and gear. As you plan your project, consider whether you truly have the time, equipment and control over your space to handle every stage properly. If not, professional assistance may not only save your floor—it could save you money in the long run.
Live in the London area and considering a professional refinishing service? Our expert team services everything from Georgian manor floors to contemporary parquet in central London. Drop us a message for a free consultation!